画像を回転するには あらかじめアフィン変換行列を求め その後にアフィン変換を施すことにより 画像の回転を行います。このアフィン変換 大学の教養課程『線形代数』で教わったような かすかな記憶が・・・・ 遠い過去の話(笑い)
- アフィン変換行列を求めるには次の2つのメソッドがあります。
GetAffineTransformメソッド:回転前と回転後の3点の座標をもとにアフィン変換行列を求める方法
GetRotationMatrix2Dメソッド:回転の中心座標と回転角度をもとにアフィン変換行列を求める方法 - アフィン変換処理はWarpAffineメソッドで行います。
| 回転前後の3点の座標をもとに回転する方法 |
回転ボタンをクリックすると
(0, 0) (0, 240), (240, 240)の3点を
(0, 240), (240, 240), (240, 0)に変換 つまり 画像の上部240*240の部分を90度回転させてみました。
using System;using System.Collections.Generic;
using System.ComponentModel;
using System.Data;
using System.Drawing;
using System.Text;
using System.Windows.Forms;
using OpenCvSharp;
namespace OpenCvShp
{
    public partial class Form1 : Form
    {
        private IplImage img;
        public Form1()
        {
            InitializeComponent();
        }
        private void timer1_Tick(object sender, EventArgs e)
        {
            img = new IplImage(@"C:OpenCvTestDataai2.jpg", LoadMode.Color);
            timer1.Enabled = false;
            pictureBox1.Invalidate();
        }
        private void btnTurn_Click(object sender, EventArgs e)
        {
            CvPoint2D32f[] src_pf = new CvPoint2D32f[] { new CvPoint2D32f(0, 0), new CvPoint2D32f( 0, 240),
                                                new CvPoint2D32f(240, 240) };
            CvPoint2D32f[] dst_pf = new CvPoint2D32f[] { new CvPoint2D32f(0, 240), new CvPoint2D32f(240, 240),
                                                new CvPoint2D32f(240, 0) };
            CvMat affineMatrix = Cv.GetAffineTransform(src_pf, dst_pf);
            Cv.WarpAffine(img, img, affineMatrix);
            pictureBox1.Invalidate();
        }
        private void pictureBox1_Paint(object sender, PaintEventArgs e)
        {
            if (!timer1.Enabled)
            {
                Bitmap bmp = new Bitmap(img.Width, img.Height);
                bmp = img.ToBitmap();
                e.Graphics.DrawImage(bmp, 0, 0, bmp.Width, bmp.Height);
                bmp.Dispose();
            }
        }
    }
}
処理結果
| 元の画像 | クリック3回目 (左回り270度回転した状態) |
 |
 |
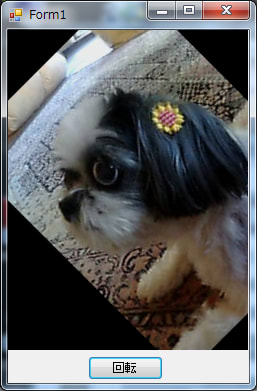
| 回転の中心座標と回転角度をもとに回転する方法 |
回転ボタンをクリックすると (120,120)を中心に 45度 回転させてみました。
using System;
using System.Collections.Generic;
using System.ComponentModel;
using System.Data;
using System.Drawing;
using System.Text;
using System.Windows.Forms;
using OpenCvSharp;
namespace OpenCvShp
{
    public partial class Form1 : Form
    {
        private IplImage img;
        public Form1()
        {
            InitializeComponent();
        }
        private void timer1_Tick(object sender, EventArgs e)
        {
            img = new IplImage(@"C:OpenCvTestDataai2.jpg", LoadMode.Color);
            timer1.Enabled = false;
            pictureBox1.Invalidate();
        }
        private void btnTurn_Click(object sender, EventArgs e)
        {
            CvPoint2D32f center = new CvPoint2D32f(120,120);
            CvMat affineMatrix = Cv.GetRotationMatrix2D(center , 45.0, 1.0 );
            Cv.WarpAffine(img, img, affineMatrix);
            pictureBox1.Invalidate();
        }
        private void pictureBox1_Paint(object sender, PaintEventArgs e)
        {
            if (!timer1.Enabled)
            {
                Bitmap bmp = new Bitmap(img.Width, img.Height);
                bmp = img.ToBitmap();
                e.Graphics.DrawImage(bmp, 0, 0, bmp.Width, bmp.Height);
                bmp.Dispose();
            }
        }
    }
}
処理結果
| 元の画像 | クリック1回目 (左回り45度回転した状態) |
| |
 |
なおアフィン変換を行うWarpAffineメソッドには4番目および5番目のパラメータが指定でき 回転後画像なしになった部分 上の処理結果で黒くなった部分の処理方法の指定が可能です。この詳細はAndroid版で実験していますのでここのborderMode およびborderValue の部分を参照してください。
| Windows7 Vs2008 OpenCv2.4 And OpenCvSharp |